 New WebGL Capabilities
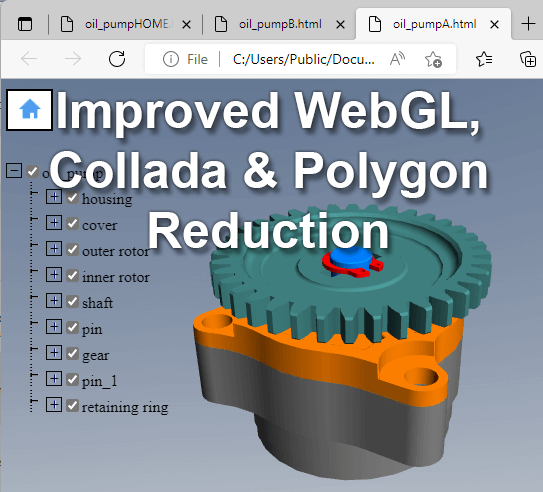
The latest TransMagic build (12.31.400) has both a home button and an assembly tree display to improve viewing and CAD data access in a browser. The image at right was captured from Google Chrome, but any HTML5 browser will support the WebGL format.
- If you click the checkmark on any component, the part will no longer be visible in the assembly; checking the box causes the part to return.
- Clicking the ‘Home’ button makes the part return to a default zoom and position.
- Pressing and dragging with the left mouse button causes the part or assembly to rotate in 3D.
- Spinning the mouse wheel zooms the image.
- Pressing and dragging the left and right mouse button at the same time lets you pan the part or assembly around the screen.
 WebGL Settings
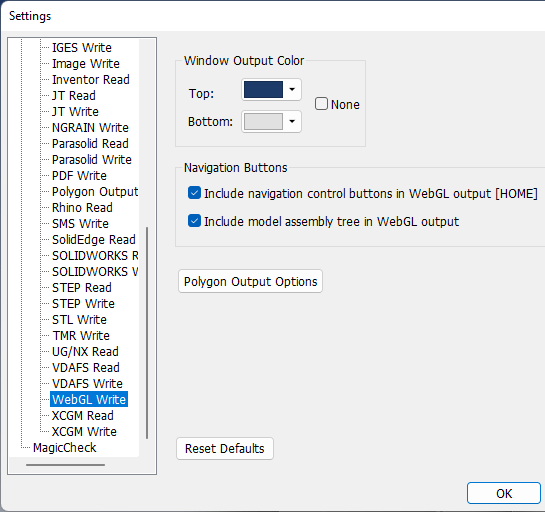
At right are the settings which can be applied to WebGL files.
- Window Output Color Top and Bottom determine the background browser window color for the WebGL file. If the colors are different, they will form a gradient.
- Navigation Buttons give you the ability to turn on or off the Home button and the Model Assembly Tree. In Settings, go to WebGL Write, and then check either or both boxes. By default, both boxes are checked. You can also uncheck both boxes if you want a cleaner look for in-browser product libraries.
- Polygon Output Options leads to the Polygon Output dialogue, which allows you the ability to control Facet Resolution with basic and advanced settings, as well as a checkbox for ‘Include Body Edges’. Body Edges are off by default, in order to keep file sizes small.
New Create Subassembly Behavior
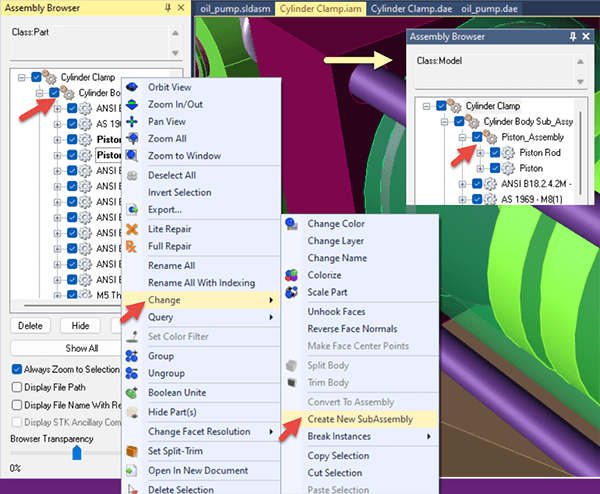
In this release, if you select parts from a subassembly and then use the Right Mouse Button menu select Change > Create Subassembly, the subassembly will be created in the subassembly you have chosen to work in, rather than at the root level of the assembly (see right side of figure for result). NOTE: Make sure to keep the Ctrl key held down during this process.
Alternatively, if you choose two parts for the new subassembly, and one is inside a subassembly and the other is at the root level, the new subassembly will be created at the root level.
Create Assembly Now Available for Collada
You can now convert a multibody Collada part to a true assembly, or convert one or more parts to a subassembly, using the Right Mouse Button menu on the desired parts and selecting Change > Create Assembly or Change > Create Subassembly. If you are selecting more than one part to put into a new subassembly, make sure to hold the Ctrl key while you are selecting the parts in the Assembly Browser, and keep holding the Ctrl key while you click the right mouse button, select ‘Change’, then select ‘Create Subassembly’.
STL and OBJ Polygon Reduction
 Many users take their CAD Brep models to a polygonal state using Polygon Reduction, but sometimes you’re starting with a polygonal model and just want to simplify it.
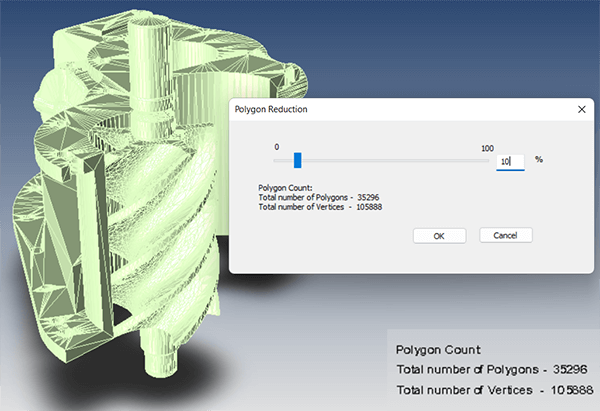
We ran into an issue like this a few weeks ago which is what sparked work on this feature – formerly, you could not use Polygon Reduction on a polygonal model, but now you can open a complex, overly dense polygonal mesh and simplify it using the 0-100 polygon reduction slider.
Simply slide to the percentage of reduction you need, and click OK. Then save out your newly reduced file to the polygonal format of your choice. Figure shows STL part density being reduced to 10%.
Our sample 1 MB SAT file grew to 17 MB when saved to STL using default settings. If the STL Write settings are tightened by about half, file size quickly balloons to 167 MB, and that’s just for a small assembly. We all know that large files can be sluggish to work with in CAD systems, and that file size and polygon count is often critical.
Polygon Reduction changes a 17MB STL file with 352,330 polygons to a 1.7 MB file with only 35,296 polygons (see figure). Your customer or supplier may not be able to perfectly anticipate your needs, but with the ability to read the polygonal (or CAD) file with Polygon Reduction, you can tune the geometry just the way you want it.
Updating to 12.31.400
As always, installation requires Administrative Rights, and that you are either a subscription customer or are on maintenance. Make sure TransMagic is not already running, download the .exe, double-click the exe and follow the prompts.
The 12.31.400 exe is available at https://TransMagic.com/download/
Not a TransMagic customer, but want to see how it works with your files? Request the 7-Day TransMagic Evaluation.
Related Articles
Dealing with Polygons in a CAD World