 TransMagic has just released a new build – R12.31.200.
For installation instructions, please see Installing TransMagic R12 SP2 and SP3 on our support portal.
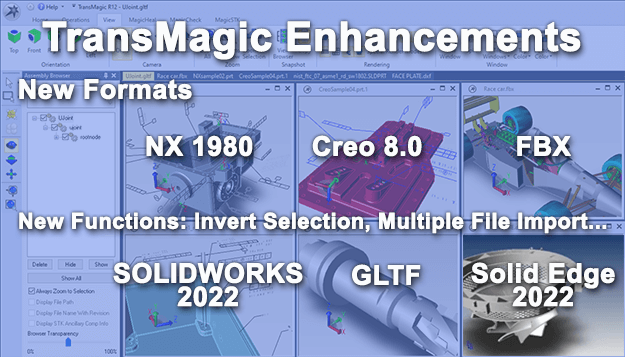
The latest round of TransMagic R12 enhancements include updated CAD format versions, new polygonal formats, and several other enhancements detailed below.
Updated CAD Version Support
- NX 1980 (Continuous Release)
- SOLIDWORKS 2022
- Solid Edge 2022
- Creo 8.0
New 3D Formats
- FBX (new) – FBX stands for Filmbox. It allows storing of objects, materials and motion, making it ideal for game development applications.
- GLTF (new) – GLTF stands for Graphics Language Transmission Format, or GL Format. It has been called the “Jpeg of 3D”. As compared to Obj, GLTF is an ideal format for rendering because it removes excess data so files are smaller and faster.
- 3MF (new) – 3MF stands for 3D Manufacturing Format. It is used for conveying model and texture information for 3D printing, incorporating textures, printing an object to a specific size and tracking parts in production systems. It has a smaller footprint than Obj and STL. Although it is based on XML, the 3MF format is compressed and thus binary.
Other Recent Improvements
- Invert Selection – Invert a selection set. Select one or more parts in an assembly in the Assembly Browser, hold the CTRL key down, and choose Invert Selection from the right button menu.
- Multiple File Import – Now you can select multiple files and import them all simultaneously.
Enhancements in MagicBatch
- You can now select additional CAD or polygonal formats for output.
- Added capability to save all translated files into a folder based on the file name.
Invert Selection
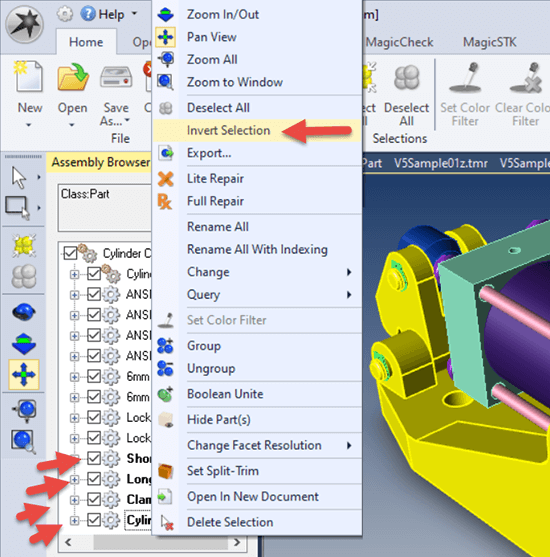 Inverting selection set was added a few builds back, but was never covered adequately so we will cover it here.
The conventional way to simplify the contents of the screen is to select everything you don’t want to see, and then ‘Hide Selected Entities’.
But in an assembly of 50 or 100 parts, this could be tedious. It would be much faster to select the three components you want to work on, and the invert the selection so that all other 97 parts are selected, and then hide the 97 parts.
That’s exactly what Invert Selection allows you to do. Just select one or more parts in the Assembly Browser by clicking on them with the Ctrl key held down. Then, while the Ctrl key is still held down, right-mouse click to bring up the right mouse button menu, and choose Invert Selection. Your selection should be inverted.
Multiple File Import
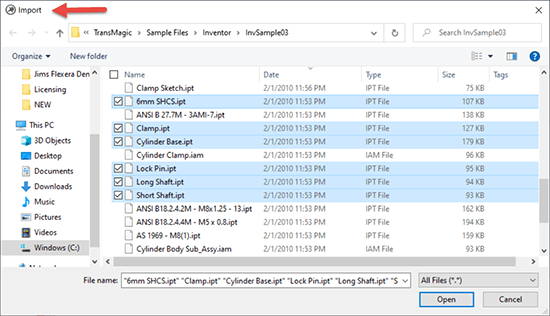 Multiple File Import lets you select any number of parts or assemblies, and import them all into the current file in one go. This has been a much-requested feature because it saves a great deal of time every time you use it, compared to importing a files one at a time.
To use Multiple File Import, just click the Import button (currently the Import button is under the TransMagic icon in the upper-left of the screen), and select as many files as you wish to import into the current file at one time.
You also have the option of clicking on New and creating a new empty assembly document, which you can then import multiple parts into at one time.
Select Additional Formats For Output (MagicBatch)
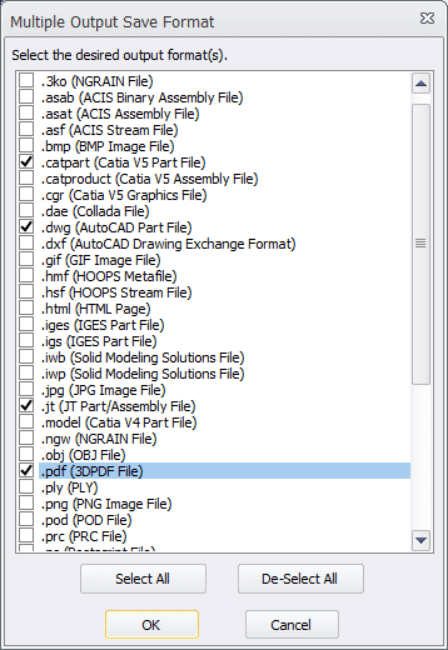 MagicBatch is a Batch Translator for CAD and polygonal files, and is an Add On product, meaning you can add it to TransMagic SUPERVIEW, PRO or EXPERT.
In the past it was always limited to converting files to a single format at a time. While this was great and saved some of our customers many hours each week, if they wanted their files in two or more formats, they had to run it again.
Now it is possible to select several formats at once, and let MagicBatch do all the work while you are working on another project, or even at the end of the day.
To use this new capability, just select the formats you want to save to from the list of supported formats for your particular TransMagic product. As a reminder, SUPERVIEW saves to polygonal formats, PRO saves to polygonal and neutral CAD formats, and EXPERT saves to polygonal formats as well as neutral and native CAD formats.
Once you’ve selected the formats you want to save to, you can click the Go button on the MagicBatch interface and all selected models will be translated to the formats you have preselected.
Select Output Folder Options
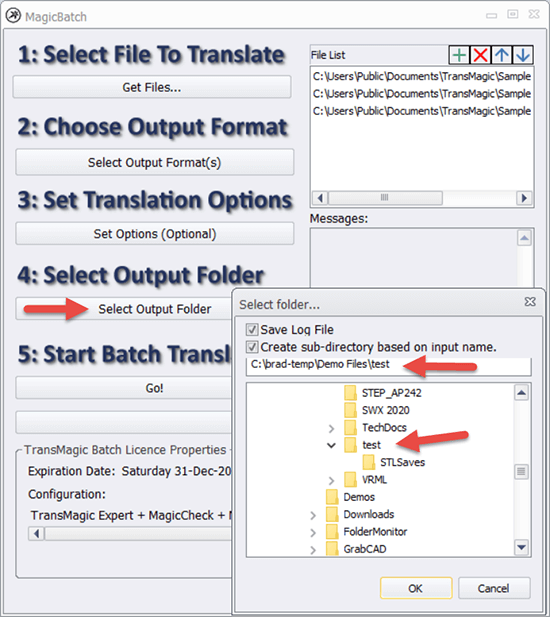 The screenshot at right gives you a good idea of what the entire MagicBatch interface looks like.
The last thing you normally do before clicking ‘Go’ is to select your output folder options. This simply tells MagicBatch where to put the translated files.
As of this .200 release, you now have two additional options on your Select Output Folder dialog box.
Save Log File will generate a log file for every translation. This log file includes, among other things, the name of the file being translated, the name of the resulting translation, and whether the translation was a success or not.
Create Sub-Directory Based On Input Name will create sub directories for each file being translated. For example, if a file is called Widget_1001A.CATPart, all translations of that part will be placed in an automatically created folder named Widget_100A.
Learn more about MagicBatch on the MagicBatch page.
Installing TransMagic R12 SP2 and SP3
Watch a technical overview video covering TransMagic capabilities.
Read ‘Are Your CAD Tools Enough‘ to see the breadth of what you can do with TransMagic.
Request a 7-day evaluation of TransMagic.