To see how fast you can repair CAD geometry, and how easily models with missing geometry can be covered with new faces using TransMagic’s MagicHeal, check out this step-by-step walkthough.
The process of covering holes and stitching it all together into a watertight solid is quick and easy. Here are the steps (video example at end of this article):
STEP 1 – Auto Repair Wizard
Start by running the TransMagic Auto Repair Wizard, a tool which automatically validates geometry and repair functions (see figure 1). This automatic CAD repair tool runs Lite Repair which stitches surfaces together as long as the surfaces meet within a specified tolerance. All TransMagic core products include Lite Repair, so whether TransMagic SUPERVIEW, PRO, or EXPERT is the base product, the automatic CAD repair functionality, Lite Repair, is included.
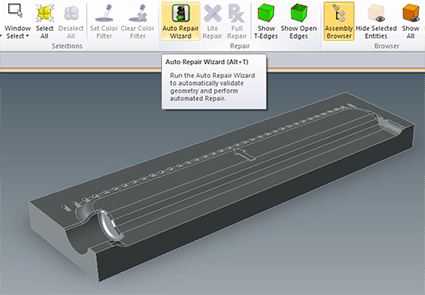
Figure 1 – Auto Repair Wizard
STEP 2 – Missing Surfaces
In this particular part, “yellow light” was indicated because the automatic CAD heal tool detected some missing surfaces. The Auto Repair Wizard recommends using MagicSURFACE to cover these holes, which are now highlighted in orange for easy visibility (see figure 2). MagicSURFACE is included with the MagicHeal Add-On to TransMagic.
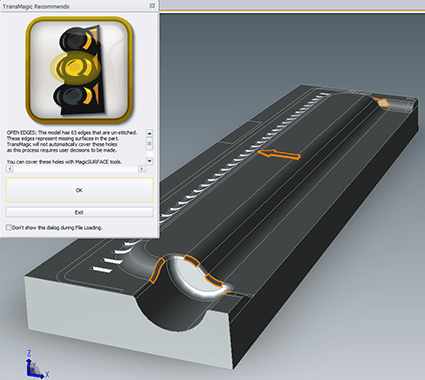
Figure 2 – The Yellow Light – Unstitched Edges
The Auto Repair Wizard will always display a colored light after performing its analysis. A green light indicates the model is of good quality and watertight. A yellow light means the model has minor issues requiring Lite Repair to be run or holes need to be covered, such as in figure 2. A red light means there are serious issues which will require running Full Repair or even Advanced Full Repair.
STEP 3 – Find Next, Assign Edge Condition, Cover Selection
Most of the holes in this example can be covered using the MagicSURFACE component of MagicHeal; simply click the “Find Next” button, select an edge on the open circuit to assign the appropriate edge condition (‘Set Smooth’ or ‘Set Sharp’) and then click “Cover Selection.” As long as there are no serious problems with the geometry surrounding an opening in the model, it will be covered automatically. The new surface will have a purple color so it can be easily distinguished from the surrounding geometry (see figure 3).

Figure 3 – Covering holes with closed circuits.
Covering Sidewalls
For more complex areas where sidewalls are missing on a boss or pocket, MagicHeal requires that you select the two sidewall edges with your CTRL key held down – select an edge from the top of the boss or pocket and from the bottom of the boss or pocket. When both are selected, click ‘Skin Between Edges’ and your boss or pocket walls will be created instantly (see figure 4).
![]()
Figure 4 – Adding sidewalls in one step.
STEP 4 – Stitch all the New Surfaces Into Place
Once all the openings in the model have been covered, a final check with Lite Repair is advisable in order to stitch all of the repaired geometry together. The various surface cover operations are working in localized areas; by selecting all the geometry and running Lite Repair, a final stitch brings all surfaces together into a watertight solid. If there are no outstanding issues with the model, and it is watertight, a green light will be displayed (see figure 5).
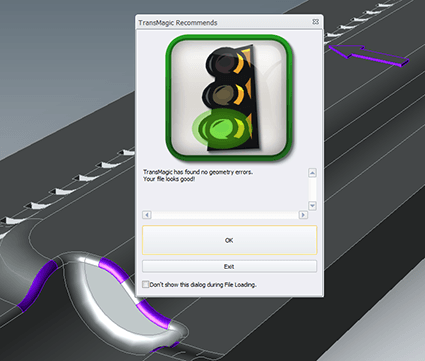
Figure 5 – The green light indicates a healthy, watertight solid.