 Assembly Restructuring allows you to work with the parts you have and restructure components as necessary to fit your design or manufacturing objectives.
Being able to restructure assemblies gives you viewing and functional flexibility, even if you no longer have access to the originating CAD system.
Where necessary, parts can be renamed, instance groupings can be broken, new subassemblies can be generated from existing parts, parts can be removed individually from subassemblies, true assemblies can be flattened and multi-body parts can be turned into true assemblies.
Creating Assemblies from Multiple Solid-Body Parts

Figure 1 – Convert to Assembly converts multi-body parts to assemblies.
Figure 1 shows a single part (with multiple bodies) on the left side, and a true assembly on the right side. Single parts are designated by a single gear icon at the top of the Assembly Browser, and assemblies are designated a double gear icon.
If you have a single part that needs to be converted to a true assembly, the process is to simply select any component in the Assembly Browser and right-click, choosing Change > Convert to Assembly.
Flattening an Assembly
Alternatively, if you have a true assembly that needs to be flattened to a single part with multiple solid bodies, select Flatten Assembly from the Operations toolbar.
Creating a New Sub Assembly
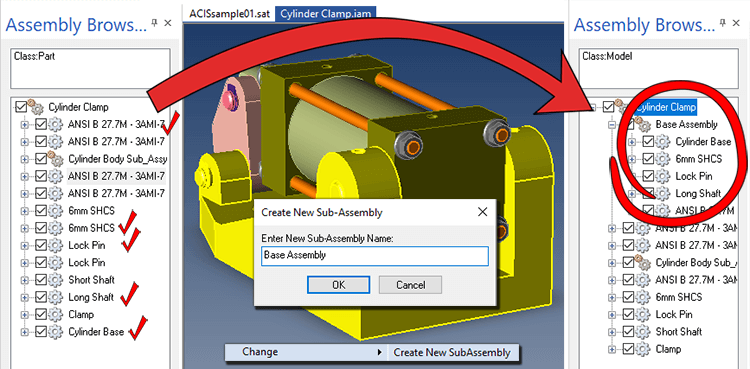
Figure 2 – Create New Subassembly
As shown in figure 2, if you want to create a subassembly from two or more parts, select the parts, right click on the parts, and select Change > Create Subassembly from the right-button menu. You will be prompted for a new name for your subassembly.
Removing Parts from a Sub Assembly
To remove parts from a subassembly, using the Assembly Browser, simply left click the part you want to remove from a subassembly and drag the part to the assembly name at the top of the Assembly Browser.
Breaking Instances
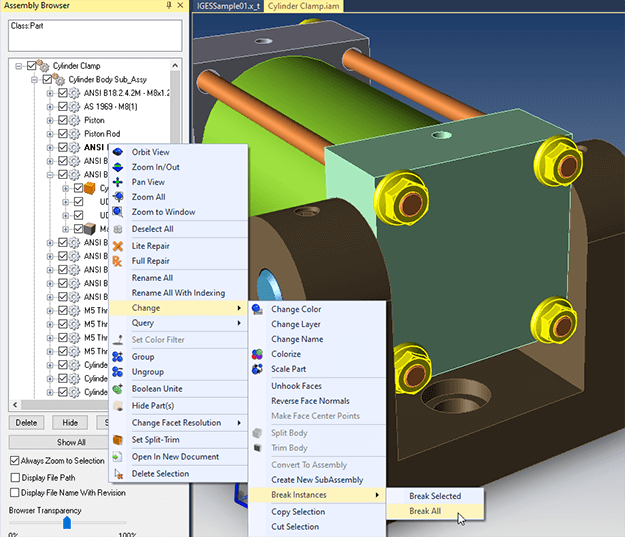
Figure 3 – You can select any instanced geometry and break all instances, or just selected instances.
Most CAD packages allow the user to “instance” geometry, placing a copy of a part more than one time in an assembly. An example of this is when you have four holes in an assembly and it is time to apply fasteners to those four holes. Using automatic placement tools, you can select all four holes and add fasteners to them faster than adding the fasteners one by one. Almost always, when you use instances in an assembly, you are certain that they will always look and behave the same as one another.
However, sometimes you need to break instances, for example if you want them to be a different color, or you need to make a change in one of them for any reason. TransMagic allows you to break instances, either individually or all at once (see Figure 3). To break instances, select the instance you want to break in the Assembly Browser, then right-mouse click to launch the right button menu, and select Change > Break Instances. To break all instances, choose Break All; otherwise, select Break Selected.
We hope this article has been helpful; please direct any comments or questions to social@transmagic.com.