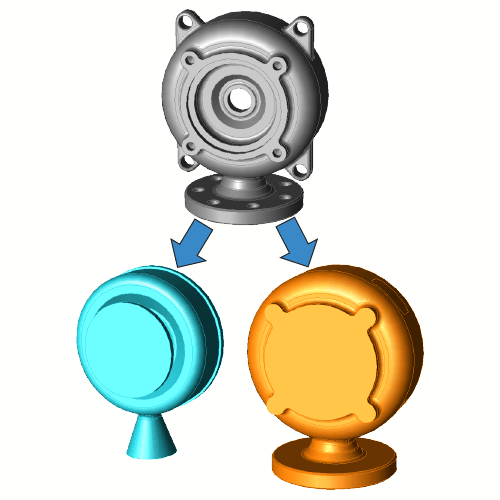
 TransMagic’s MagicHeal has the ability to take a CAD model such as this discharge casing (courtesy of Nayla Miana Luiz, as seen on GrabCAD) and perform ‘CAD Inner and Outer Volume Separation’, or split the geometry out into inside and outside volumes (see figure at right).
Generating inside and outside volumes could be useful for generating precise estimates of surface finishes or coatings, or in mold development (where each volume becomes a core body). In the process of generating these solid bodies we remove various features, so this is also a tool for defeaturing a model. There are various reasons you might want to remove features from a model, for example removing features to protect proprietary information when collaborating with outside design teams, or in an effort to simplify geometry for compute-heavy finite element analysis processes.
Watch the video to review the entire overview in about five minutes, or check out the step-by-step process below:
Step-by-Step CAD Inner and Outer Volume Separation
- Select and delete the faces that connect the inside and outside bodies.
- Select the entire part and use the Ungroup command from the MagicHeal menu to break the single body into two bodies.
- Hide the inside body.
- Delete the faces for any features you want to do away with. Leave intact any geometry necessary to cover the holes caused by deletions. In the video, I delete all of the holes and a few other features as well, by deleting faces.
- Run Lite Repair from the Home menu. Lite Repair will stitch together the surfaces where it can, and point out any areas that need patching.
- Select the edge of any Open Circuits (areas that need to be patched) and run Cover Circuit from the MagicHeal menu.
- Once all the circuits are patched, select the entire outside body and run Lite Repair again. This should give you a watertight solid.
- Check to verify that the solid is good quality by running a Mass Properties check from the Operations menu.
- If the outside volume is good, it’s time to deal with the inside volume. Use Precise Positioning to move the outside volume out of the way. Then right click in the screen area and choose Show > Show All. This will turn the inner volume geometry back on.
- Delete faces on the inner body geometry if necessary, wherever you want to get rid of geometry; normally though, inner bodies are pretty complete already. Select the entire inner body geometry and run Lite Repair. Go through the steps of selecting and patching circuits as necessary. Run lite repair again to stitch all the faces into place and create a watertight solid.
- On most inner volumes, you will find that the face normals point ‘in’ instead of ‘out’. This geometry may stitch together and become watertight, but ideally all face normals point ‘out’. In the video I accomplish this by running Full Repair. This can also be accomplished by selecting any faces that are pointing inward, right clicking with the mouse, and then selecting Change > Reverse Face Normals. If you go that route, run Lite Repair one more time, and you should have a solid model which will give you an accurate Mass Properties calculation.
Again, it is important to note that this process requires the MagicHeal Add-On.