Using TransMagic for NON-CAD Users
TransMagic On-Boarding: Lesson 2 of 6
(to see all of the On-Boarding lessons, click here)
Who in your company needs better access to 3D model data? Or who in your company is using expensive CAD licenses for only basic access? This lesson is specifically for them. If there are others in your company that you think could benefit from trying TransMagic with their own trial, please …
TransMagic is powerful but easy-to-use. Non-CAD users can view, mock-up, and even interrogate CAD models from practically any 3D CAD system – using the native format, no need to request a neutral format that can lose data.
Sharing couldn’t be easier – in addition to exporting 3D native CAD formats, TransMagic can create .PNG, 3D PDF, Web GL, and many more. Click here to see the complete list.
NOTE: This is lesson 2 of 6 of the introductory series for TransMagic. Visit TransMagic On-Boarding for a list of all the lessons.
Here are just some of the use cases:
-
Digital Mock-Up: In a single workspace within TransMagic, import multiple models (regardless of their CAD format). Include jigs/fixtures/tooling and annotations – very useful for reviews with multiple stakeholders.
-
Estimating and Quoting: Receive essentially any 3D format. Use TransMagic to inspect, measure, and verify geometry integrity of customer models’ as part of the quote generation process. TransMagic also makes it easy to share with your team and gather input.
-
On-Line Parts Libraries: Create an interactive experience for part identification and verification. One of TransMagic’s output formats is Web GL, a common format for enabling a lightweight 3D experience.
-
Purchasing: Use your design department’s CAD models directly along with all of their annotations including PMI and MBD.
-
Sales: Share 3D model data easily with customers and prospects.
-
Technical Documentation and Marketing: Easily create views directly from the 3D model and add annotations.
Lesson 2: Non-CAD Users
In this lesson, you will learn how to:
-
Verify the integrity of a 3D model
-
Use TransMagic advanced 3D viewing capabilities
-
Create annotations that are attached to the 3D model
-
Add dimensions to the 3D model
-
Interrogate the model for its mass properties
-
Create markup drawings that can be printed
-
Save an image
-
Create an interactive 3D PDF or Web GL file
Here are some steps to get you started using our sample files:
-
Start TransMagic
-
Open a 3D data file:
-
TransMagic installs with many sample files. This directory is located here:
-
“C:UsersPublicDocumentsTransMagicSample Files”
-
-
Load the file …”Sample FilesInventorInvSample03Cylinder Base.ipt”
-
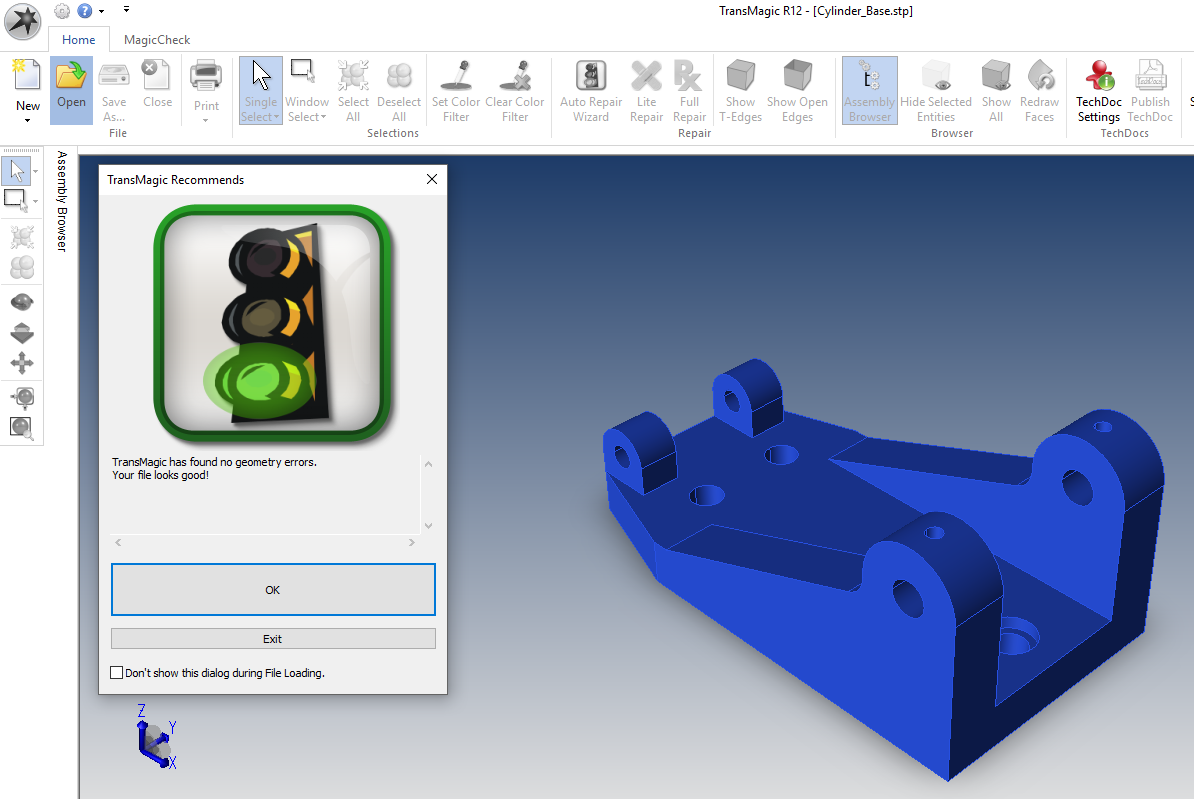
After selecting OPEN, notice the fast verification of the model that occurs with the Auto Repair Wizard
-
-
Verify the integrity of the model:
-
If the Auto Repair Wizard presents a green light, you know that your model integrity has been verified.
-
-
Right-click on the model; here are just a few operations you can perform:
-
Viewing commands:
-
Orbit, Zoom, Pan, Zoom to Window
-
-
Selection commands:
-
Single Select, Window Select, Filter Selection
-
-
Show commands:
-
Vertices, Edges, Faces, Hidden Lines
-
-
-
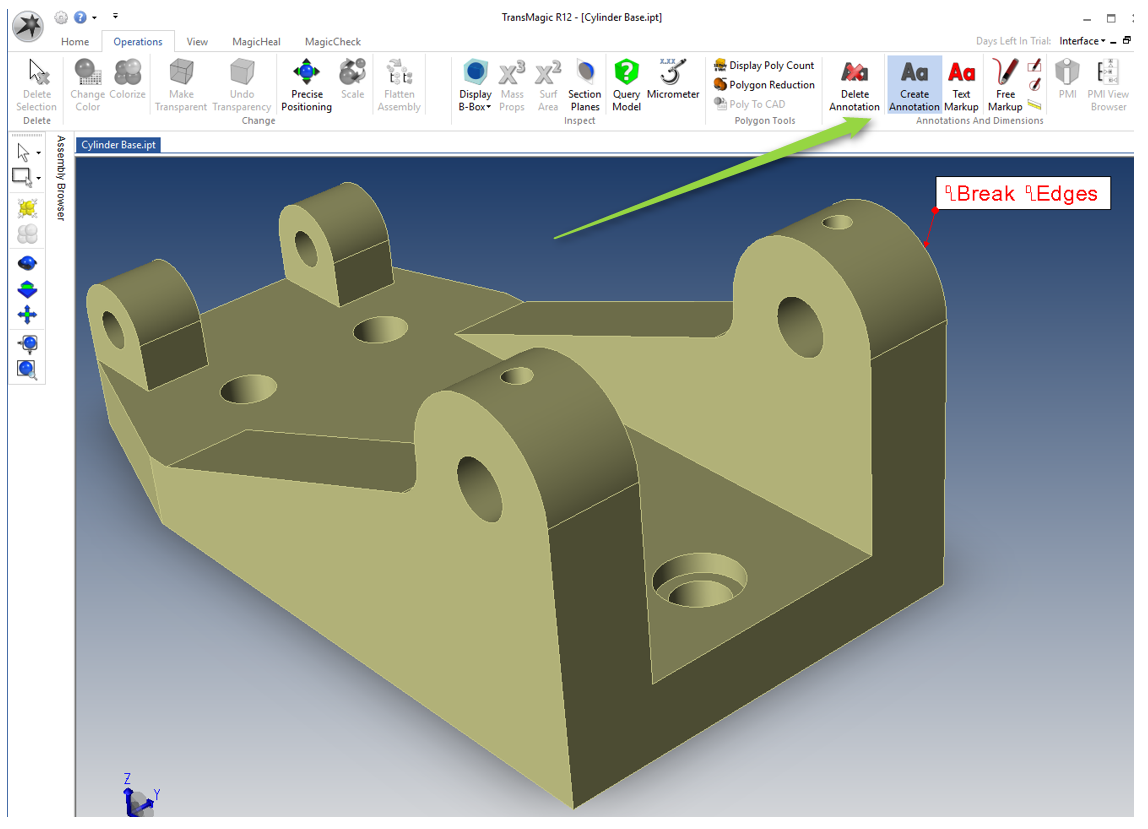
Create annotations:
-
Click the Create Annotation button from the Operations toolbar and click on the edge or face you want to attach the annotation to. Annotations can be moved around at will by pressing and dragging with the left mouse button.
-
-
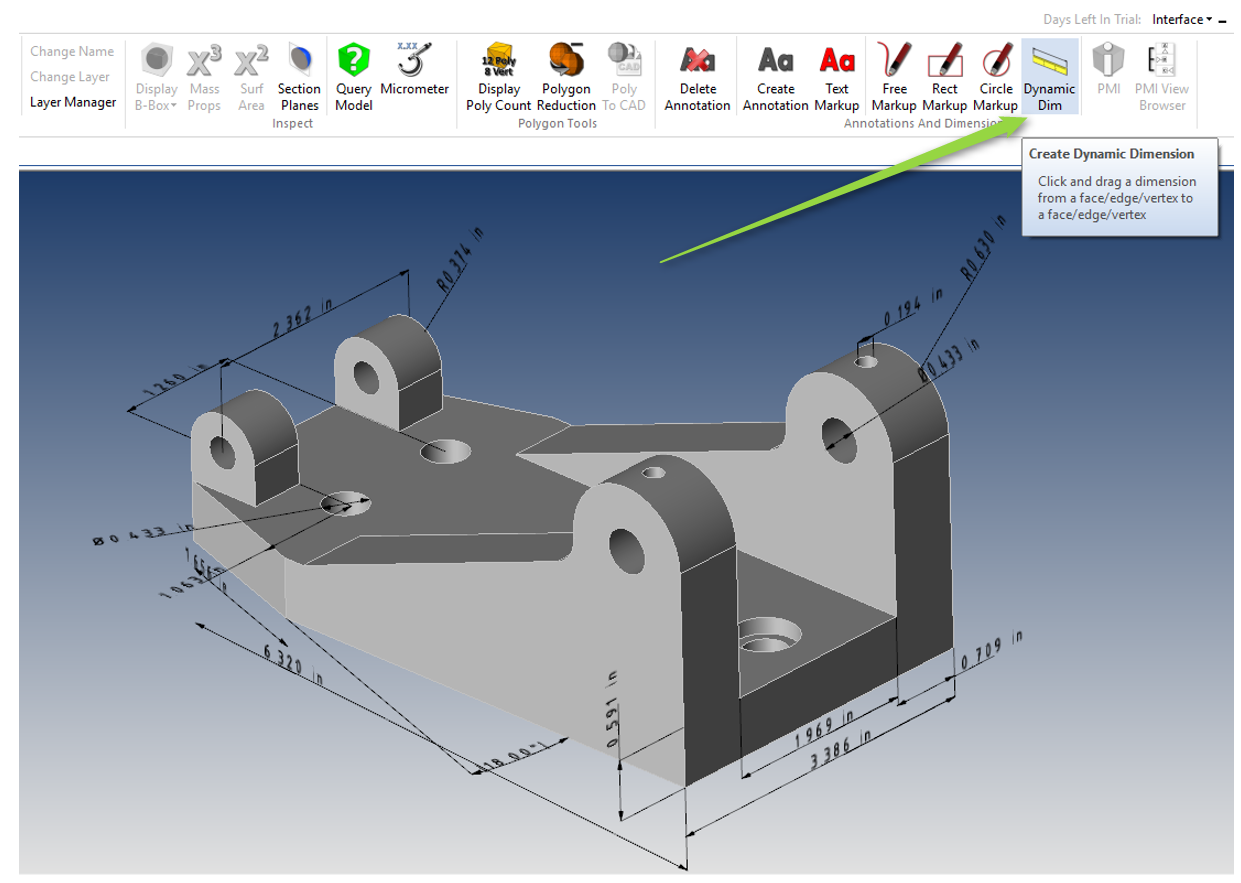
Add dimensions:
-
From the Operations toolbar, click Dynamic Dim and use the left mouse button to select the edge or face you want to dimension
-
Then select another edge or face, or place the dimension with your left mouse button.
-
Dimensions can be moved around by pressing and dragging with your left mouse button.
-
Dimensions can be deleted by clicking on the Delete Annotation button and selecting the dimension you want to delete.
-
You can save your dimensioned drawing out to PDF for distribution. From the Home toolbar, choose Save As > PDF; you will then be prompted for 2D PDF or 3D PDF. Choose 2D PDF. The 2D PDF file can be opened by double-clicking on it.
-
-
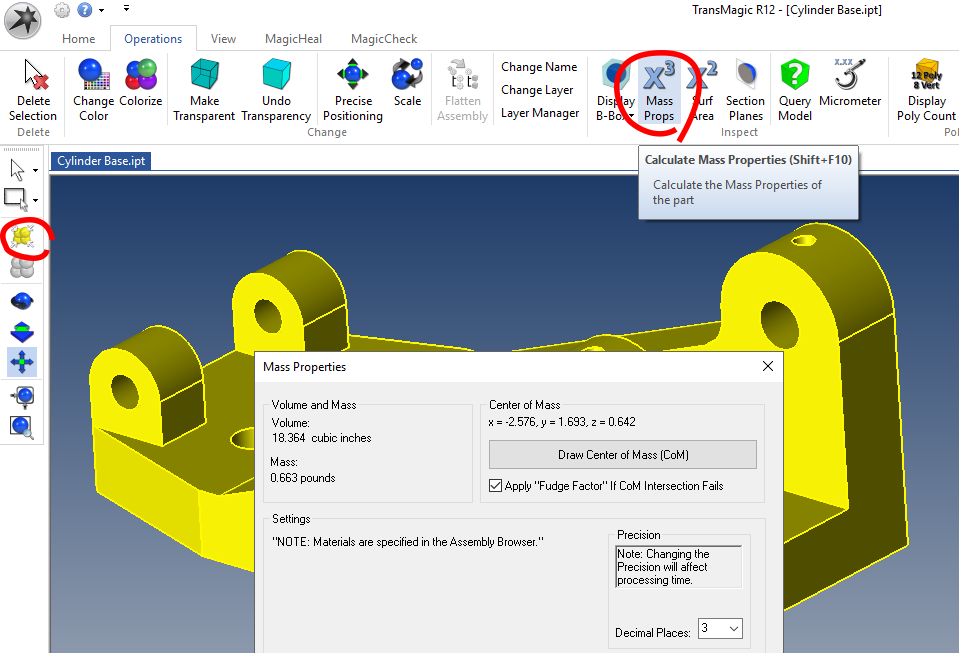
Mass Properties interrogation:
-
Double-click the part to select it, then choose Mass Props from the Operations toolbar.
-
Bounding box and surface area calculations are also available from this toolbar.
-
-
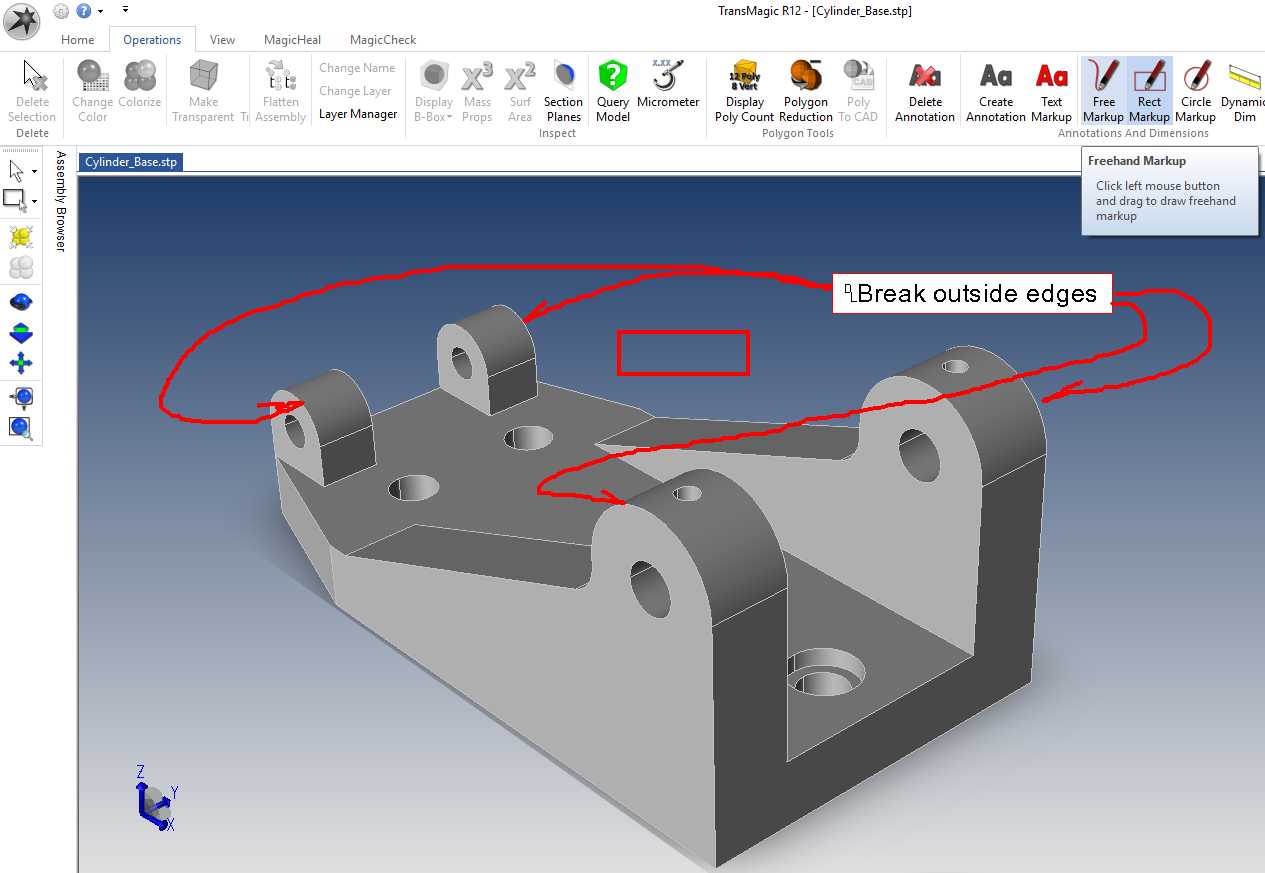
Markup Tools: Note: Markup operations are temporary, they will disappear when the model is moved. If you want to attach text to the model that is permanent in the TransMagic file, use ANNOTATION which is described above.
-
From the Operations toolbar, click on Text Markup to add markup notes. Just click on the screen where you want to place the note, and start typing.
-
Click on Free Markup and press-drag with your left mouse button to draw freehand lines and arrows.
-
Rect and Circle markup tools create rectangles and circles wherever you press-drag.
-
Markup can be saved to views in the View Browser (the View Browser is found on the View toolbar). To save markup to any particular view, just click New on the View Browser.
-
Markup can be printed by clicking on Print from the Home toolbar.
-
Markup can also be saved to the Windows clipboard using Copy image. From the View toolbar, click on Copy Image. You can then paste this image into Photoshop or Windows Paint to save as an image format.
-
To remove markup from the screen, simple rotate your view or zoom. Markup is temporary and lasts only until the screen is regenerated.
-
Once your markup has been cleared, you can create new markup and save it to a new view using the View Browser.
-
-
Saving out to image or 3D PDF:
-
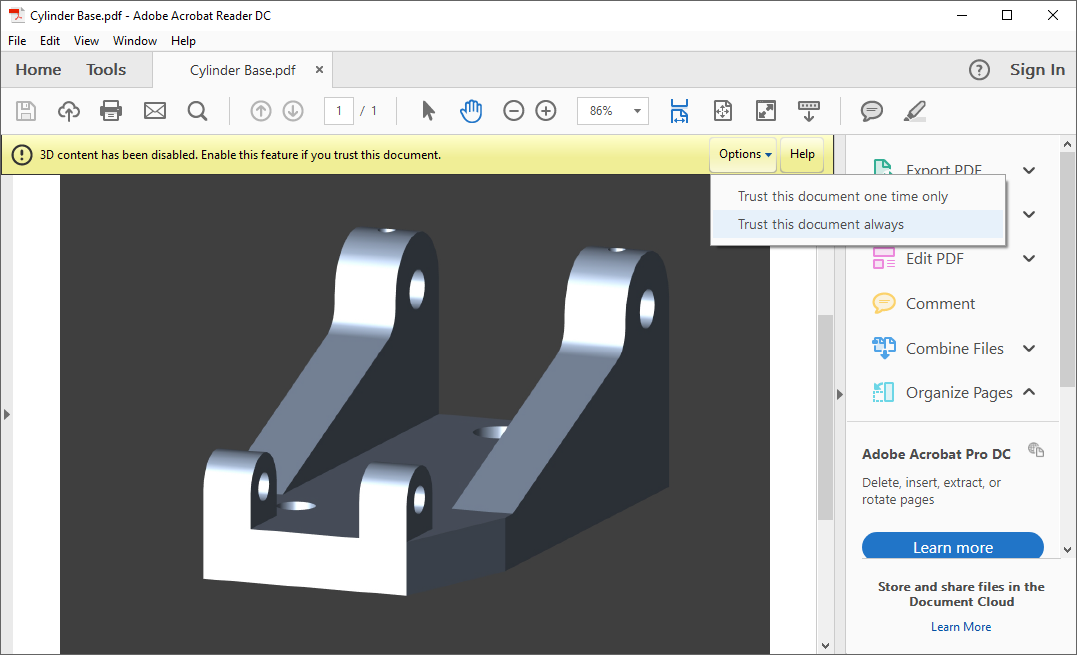
From the Home toolbar, select Save As and choose the PDF; you will then be prompted for 2D PDF or 3D PDF. Choose 3D PDF. Take note of where you save the file.
-
Open the 3D PDF file by double-clicking on it. As shown in the figure below, you will be prompted that “3D content has been disabled. Enable this feature if you trust this document”. You can enable 3D content by clicking on Options > Trust this document one-time only (or always).
-
-
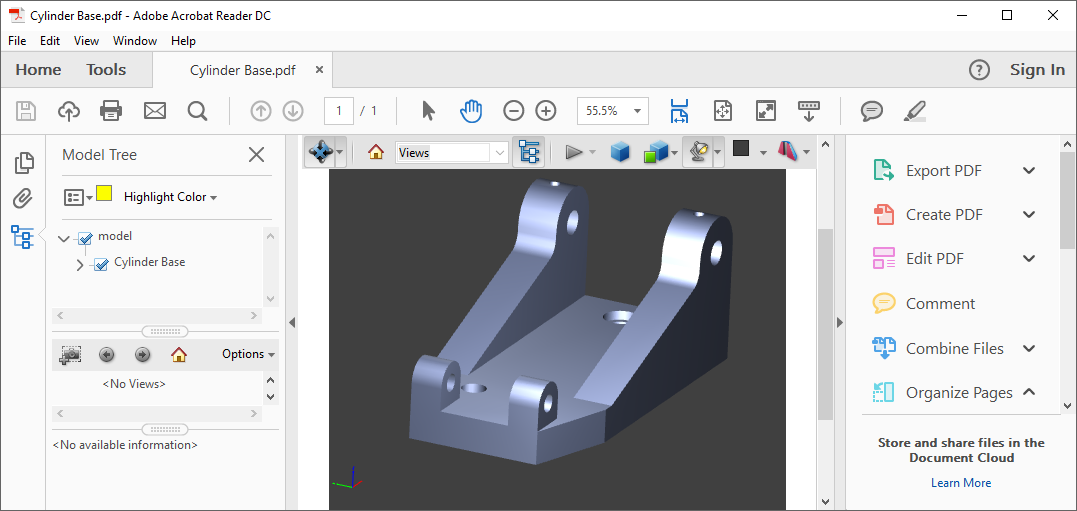
Saving out to image or 3D PDF, Continued:
-
Once you have enabled 3D content, click on the model and you will be able to rotate it around by pressing and dragging in the view area with your left mouse button.
-
The assembly structure for the model is shown on the left under Model Tree, and if you’ve saved any views with the TransMagic View Browser, they will show up in the area beneath the Model Tree.
-
-
Saving out to Web GL:
-
From the Home toolbar, select Save As and choose the Web GL. This process will create an HTML file. Let’s name the file 3D-library-part.html.
-
Open the file by double-clicking; then choose the Web browser you want to view it with.
-
You can also upload this model to your website. If a user clicks on 3D-library-part.html, it will open up this zoomable and rotatable 3D file in their current browser.
-
