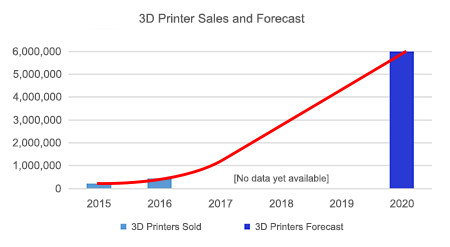
Figure 1 – 6 million printers could be sold in 2020.
By Brad Strong and Todd Reade
The 3D printer market is exploding. According to the Gartner group, approximately 220,000 3D printers were sold in 2015, the number doubled to about 450,000 in 2016, and we are on track to see a factor of 15 increase to 6 million units sold, per year, in 2020*. These numbers include both personal and business usage.
Here at TransMagic, we are interested in the business/industrial use of 3D printers. Many of our customers are using 3D printers for prototypes, jigs/fixtures, and even production parts. The many industries adopting 3D printers form a broad base, from health care to aerospace to machinery to architecture.
The idea of 3D printing is not new; it was first introduced by 3D Systems decades ago. Thanks to several years of development and optimization, 3D printers have become affordable, reliable and precise enough to be of great use in the industrial environment. For industrial usage, we expect just about any company that is designing parts to embrace 3D printing in some manner.
It seems daily there are new advances and even new companies in the 3D printer space. However, the different features and capabilities of 3D printers can be quite confusing. As experts in 3D data, we think we can provide some clarity for those considering a 3D printer purchase. That’s why we’ve put together 3D Printers Under $4000 Compared for Industrial Usage.
TransMagic develops easy-to-use power tools for 3D CAD data – supporting all major formats, both proprietary and open standards like STL, OBJ, STEP, and IGES. With TransMagic, virtually any 3D format can easily be optimized and converted to STL and OBJ, which are the primary formats used for 3D printing.
The following are the opinions of TransMagic. No compensation was received from any of the 3D printer manufacturers.
Arbitrary Categories
As we began to wrap our heads around this exploding market, one thing we noticed was that there are a lot of arbitrary categories; from ‘hobbyist’ to ‘pro’, from ‘budget’ to ‘prosumer’, and from ‘novice’ to ‘expert’. We decided that a graph of the key capabilities important to the industrial buyer of each leading printer could help put the differences in perspective and help buyers determine which model best suits their purpose and budget.
Methodology
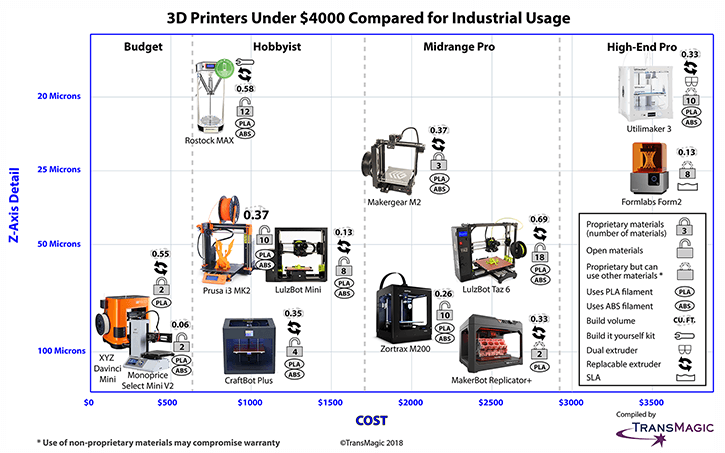
To do this, we looked for the top reviews of 3D printers for 2017 and compiled our own comparison. To find the top reviews, we relied on Google; using a search for Best 3D Printers 2017, we took the top twelve Google results and analyzed the content. Every printer that received strong approval from at least three of these reviews was included in our list. We then charted the best rated 3D printers into the graph below, highlighting critical features.
Figure 2 – 12 great 3D printers under $4000.
Criteria
Cost: Rather than impose our own contrived categories on these relatively new devices, we decided to plot them out and see where they arranged themselves. The most popular 3D printers fall into four rough categories, which we will call Economy (Below $500), Hobbyist ($700-$1200), Midrange/Pro ($1800-$2500) and High-end/Pro (~$3500). Each of these categories are separated by a dashed line on the chart. This is a snapshot in time; capabilities and pricing are constantly evolving.
Hobbyist vs. Pro: We are designating the right half of the graph as Pro devices because they are increasingly becoming fixtures in the professional space. For example, Local Motors is using the Makerbot Replicator+, HGM Automotive Electronics uses the MakerGear M2, Water Pik uses the LulzBot Taz 6, Volkswagen Autoeuropa uses Ultimakers, and Sony’s Fabrication Arts and Design uses the Formlabs Form 2. When it is easy to find serious industrial users of each of the 3D printers in the Midrange/Pro and High-end/Pro categories, it signals that 3D printing has turned a corner in mass adoption.
Minimum Layer Height: This is the Z precision of your 3D print. The precision of the 3D printers listed above ranges from 100 microns (about the thickness of a human hair) to 20 microns – the smaller the number, the more precise. A 100-micron layer height is accurate enough to work for many prototypes, but the surface will not be perfectly smooth. If you need a smooth surface model, 3D printers in the 20-25-micron range will give better results, but it’s important to note that smaller layer height can take longer; printing the same-sized part could take four times longer if you are printing 25-micron layers as opposed to 100-micron layers, and the more layers you print, the more things can go wrong. In many cases you may need to sand the printed parts to get the finish you need; for this reason, many users opt for 100-micron layers, even on devices that are capable of higher precision.
Total Build Volume: To help arrive at an easy “apples to apples” comparison, we multiplied the build area dimensions, width x height x thickness, to arrive at a total build volume value in cubic feet (cf). That number is displayed on the chart, next to the model, and ranges from .06cf to .69cf. A build volume of .06 is big enough to print a coffee cup, whereas a .69 build volume is big enough to print a basketball.
Replaceable Extruders: What happens if your 3D printer’s extruder (sometimes called the ‘print head’) fails? Is it replaceable? We were able to confirm that the Makergear M2, the MakerBot Replicator +, the Ultimaker 3, both Lulzbots, the Rostock Max and the Craftbot Plus all have replaceable extruders.
Single or Dual Extruders: Dual extruder machines allow the printer to build the model with two different filaments at the same time, without manually changing the filament. Two benefits of dual extruders are: 1. You can print in two colors or two material types or 2. you can print your model faster. Printing with different types of filament creates new opportunities. A very common use case for different filament types is to use a dissolving filament for building support structures so that they can be easily removed. Another use case would be to combine a filament that for instance is “wood-like” with another that is “metal-like”. Even with PLA, there are some very exotic filaments being brought to market; see the section on materials for more information.
Materials: A recent Stratasys survey found that 54% of respondents cited ‘limited materials’ as a primary challenge for the adoption of additive manufacturing going forward **. All of the filament 3D printers listed here can extrude PLA plastic, and most (other than the Replicator + and the DaVinci Mini) can also extrude ABS plastic. Each printer on the graph has an indicator for whether it prints ABS or just PLA. Keep in mind that even if the printer you have got your eye on cannot extrude ABS, these printers instead offer a ‘tough’ PLA material.
Proprietary Materials vs. Open (or ‘Third Party’) Materials: On the graph, we have indicated by use of a padlock symbol whether each printer accepts only proprietary materials, or can be used with third-party materials. Some manufacturers welcome third-party material usage but state or imply that their usage would compromise the warranty. The MakerBot Replicator+, for example, has available an ‘experimental’ extruder which will accept a wide range of third-party materials, but this extruder is not covered under the warranty or ‘Makercare’. So, if you have specific questions or concerns in this area, contact the manufacturer.
Total Number of Materials: The total number of materials printable by each printer is shown inside the padlock symbol. This number was arrived at by reviewing each printer’s supported filament listings, whether they were proprietary or approved third-party materials. This is at best an approximation since there are new materials constantly being developed by the printer manufacturers, as well as suitable third-party materials which have not been tested by the printer manufacturers yet.
Different Performance with ABS, PLA, and with Benchmark Models: It is important to note that each specific 3D printer might do a good job with one material and perform poorly with another material; not only that but each printer might do well printing one benchmark model and poorly with another. With that in mind, check out this article by Tech Gear Lab which compares (complete with pictures) several of the above printers by printing 15 diverse parts with both ABS and PLA plastic. Tech Gear’s favorite printer? The Ultimaker 2 (their review of the Ultimaker was completed before the Ultimaker 3 was released).
Standout Performers for Industrial Usage
By virtue of being strong favorites of at least three of the top twelve reviews, these are all great 3D printers, but you will have to consider your own unique needs to make the right choice.
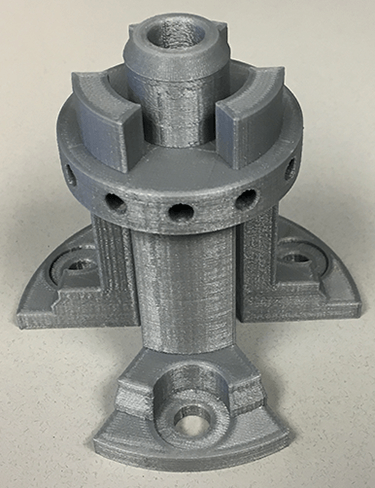
Figure 3 – This Ultimaker 3 sample part is a tool used to hold customer parts on a manufacturing line.
Our favorite 3D printer was the Ultimaker 3, for its ease-of-use, support material options, consistently high-quality prints, large print volume area, high precision and a wealth of materials. Since the data was leading us to conclude that the Ultimaker 3 was the best 3D printer for under $4000, we asked them to supply us with a sample part, created by them and without any post-processing, so we could examine it for ourselves.
The part shown in figure 3 is used for part positioning on a manufacturing line; it’s about 4 inches high. Though the layers are visible, they’re very small and tight, and even the smaller holes on the sides are very clean cylindrical openings. Ultimaker tells us that this print was made using PLA Silver, with PVA Support material, a 0.4 nozzle and 0.2 (200 microns) layer height.
Ultimaker materials range from the standard PLA and ABS to CPE (chemical resistant and tough), PVA (water soluble), PC (strong, tough and heat resistant), TPU 95A (wear and tear resistant) and PP (fatigue and chemical resistant).
Utilimaker has two effective solutions for removal of support material, allowing you to either remove breakaway material with pliers or, for smaller structural support areas you can dissolve the PVA support material in water.
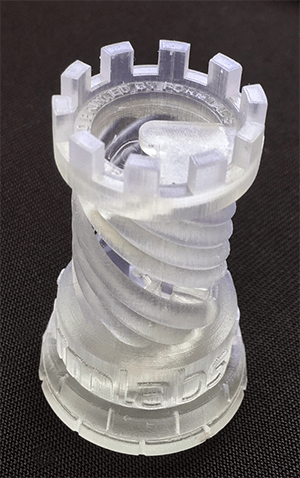
Figure 4 – The Formlabs rook is a high-quality sample.
We also liked the Formlabs Form 2, primarily because of excellent print quality. The Form 2 is the only SLA (Sterolithography) device that made our list. SLA printers work by emitting a beam of light which traces cross sections of a 3D model, layer by layer, in a vat of liquid photopolymer resin.
There is a standard resin, as well as several specialized resins for toughness, flexibility, durability, high temperature, casting and dental applications. While the Form 2 may not be able to compete with the build volumes of most of the other 3D printers, it provides very high-quality prints that require minimal post-production effort, and is great for small precision parts.
We asked for and received a choice sample part from Formlabs, and were impressed enough with the quality to display it in figure 4 at right; it’s about 2.5 inches high, and the striations between each level are almost impossible to detect. This part is a 2-inch high example using their translucent material which is capable of 25-micron detail.
As mentioned earlier, all of the printers in the Midrange Pro and High-End Pro categories are worthy of consideration for industrial usage, both by virtue of their rankings in reviews as well as their adoption by industrial users. Also see the section on FDM & FFM vs SLA immediately below.
Additional 3D Printer Comparison Considerations
Filament vs Resin: All but one of the 3D printers mentioned in this article use either Fused Deposition Modeling (FDM) or Fused Filament Fabrication (FFM). Both processes are essentially the same, guiding and heating a plastic-like filament, layer by layer, to build a 3D object. At the end of this process, there may be a fair amount of post processing (removing support material and sanding) necessary in order to have a smooth, good looking print.
Stereolithography (SLA) is the process used by the Form Labs Form 2 3D printer to build models from a vat of resin. Post-processing includes washing the model in alcohol to remove the sticky resin residue, curing the model in ultraviolet light, and removing any unwanted support material, with little or no sanding required, depending on your application.
The materials costs for SLA resin are higher than for FDM and FFM filament. One liter of resin provides roughly the same build material as you would get out of one kilogram of filament, but one liter of resin for the Form 2 costs $149, whereas one kilogram of filament (depending on the brand and material properties) costs between $25-$70, making resin 2 to 6 times more expensive than filament for the same amount of material.
If your design is complete and you are aiming for the best possible print, SLA would provide the best result; but if your design process involves several design iterations, a filament-based 3D printer would seem to be not only more economical, but some of the finishing steps might be skipped altogether on early prototypes where fit and function are more critical than a smooth, clean appearance.
Build Dimensions: Some shapes print better in one direction than another, in terms of both final appearance and structural integrity, so if you have a particular sized model you need to print, check these LxHxW values. Orientation can make a big difference in the result. Research the best direction to build your print, based on shape or support requirements. For some tips on using TransMagic to orient or translate your 3D print, check out 3D Printing CAD Files.
Heated Build Plates: All of the non-SLA printers shown here except for the MakerBot Replicator+ have heated build plates, which helps the print material to affix itself to the plate; the Replicator+ does have a flexible plastic build plate that makes removing parts easy. Heated build plates are mandatory for printing ABS, since ABS shrinks as it cools, leading to detachment from the build plate. If the print material slips loose from the build plate, the entire print job is usually compromised, so heated build plates are becoming ubiquitous. While the Replicator+ does not print ABS, the Replicator 2X does, and comes with a heated aluminum build plate.
Nozzles: The majority of 3D printers listed in this article have .4mm nozzles which accommodate filament diameters of 1.75mm; this includes the Replicator+, the Prusa i3, the XYZ Davinci Mini, The Monoprice Select Mini, the Zortrax M200 and the Craftbot Plus. The Rostock Max has a nozzle size of .4mm and the Makergear M2 has a nozzle size of .35mm (both of these printers also use the 1.75mm filament diameter). The real outliers in this group are the Lulzbot products (the Taz 6 and the Mini), with nozzle sizes of .5mm and filament diameters of 3mm, and the Ultimaker 3, with a nozzle size of .4mm and a filament size of 2.85mm.
Dangerous Fumes: It goes without saying that any 3D printing area should be well ventilated or equipped with an air filtration system, even if you are just printing with PLA plastic. ABS, PLA and other materials, when heated, can release fumes known as VOCs (Volatile Organic Carbons). Some materials release more toxic fumes than others, as well as nanoparticles (particles with a diameter of less than 1 micron) which can be absorbed by both the lungs and skin. Read the article “How Toxic Are ABS & PLA Fumes? 3DSafety dot Org Examines VOCS” (no outbound links shown according because of site security settings).
3D Data Considerations for 3D Printing
Acquiring 3D Models: Many hobbyists start by acquiring and printing 3D models from locations like STLFinder.com, Thingiverse.com (sponsored by MakerBot), Pinshape.com, MyMiniFactory.com, GrabCad.com and more. Generally, all you need is a good quality STL file, a 3D printer and a roll of PLA plastic filament to print a model.
Creating 3D Models: If you are going to create a 3D model, your choice of tools can range from the free version of Sketchup or OnShape to full-blown CAD systems like Inventor, SOLIDWORKS, Solid Edge, Creo, NX and CATIA. Some of the 3D printers even come with their own downloadable (and rudimentary) modeling software. Check out our article on How to Choose a CAD System, and watch for our upcoming article on CAD system comparisons.
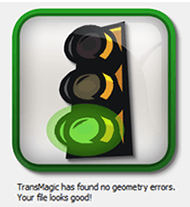
Figure 5 – TransMagic’s green light validates that your CAD file is healthy and watertight.
Validating and Repairing CAD Models: Whether you acquired or created your 3D model, if it isn’t watertight, it’s not a good candidate for 3D printing.
TransMagic SuperView instantly assesses the integrity of the model, returning a red, yellow or green light to indicate model quality. A Yellow light means there are any openings in the model, a Red light means there are more serious geometry problems that need to be fixed, and Green indicates your model is good to go. Some customers use this red-yellow-green light functionality as an assessment tool before commencing work on a project.
In most cases, TransMagic can repair the model with a simple click of a button. In more extreme cases, the MagicHeal add-on provides advanced repair capabilities to resolve issues such as inverted vertices and missing faces. See examples of Advanced Repair here.
It’s a good idea to know your model quality before you start printing it. With TransMagic SuperView, if you get the green light, you know it’s watertight!
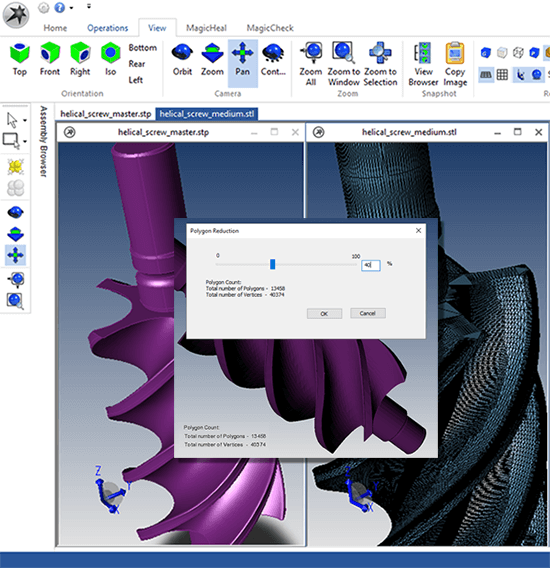
Figure 6 – CAD to STL Optimization and Polygon Reduction
Translating Proprietary CAD Models to STL for 3D Printing: One aspect to 3D printing that is rarely discussed is how to get that model into a format that the 3D printer can digest, most commonly STL or OBJ.
STL and OBJ are polygonal approximations of the BRep models created by CAD systems. It is important to have control over this translation, so that the resulting model looks as good as possible, yet is not so large as to be unwieldy and slow to process.
TransMagic SuperView provides STL and OBJ optimization settings to help you control the mesh density across faces or curves, so that you can get just the right mesh density for your part.
In addition, the Polygon Reduction tool allows you to drag a slider and see the mesh update dynamically, allowing you to optimize mesh density with minimal file size for faster 3D print processing (see Figure 6). Read more about Optimizing STL Output here, and Polygon Reduction here.
See the end of this article for a special offer.
Collaboration: The most common format for sharing is with 3D PDF. Anyone who has the standard FREE Adobe Reader (which is everyone) can open, zoom and rotate these interactive 3D PDFs. If you want to put your model on the web or intranet, TransMagic’s WebGL format allows you to create entire online libraries of parts; WebGL files can be viewed and rotated in any HTML5 browser with no plugins necessary.
In addition to reading all major 3D CAD formats, TransMagic SUPERVIEW allows you to measure, dimension, perform mass properties calculations and create custom views. Other TransMagic tools allow you to save to CAD formats, compare revisions and batch convert thousands of models to the format of your choice automatically.
Special Offer
As mentioned earlier, TransMagic SuperView can help you view and process your CAD models into STL files, with optimal resolution and meshing, and ready to print! You can test drive TransMagic SuperView with this FREE 7-day trial. If you decide to purchase, mention this blog article to get 10% off TransMagic SuperView.
Stay tuned! In a future article we will compare high-end industrial printers.
ABOUT TransMagic
Founded in 2001, TransMagic develops easy-to-use power tools for 3D CAD data. TransMagic supports all major formats, both proprietary and open standards like STEP and IGES. Companies of all sizes use TransMagic to translate, compare, validate, repair, mock-up, and view 3D model data from virtually any CAD system. Any company that handles 3D file formats for Mechanical CAD (MCAD), Computer Aided Engineering (CAE) or Computer Aided Manufacturing (CAM), can benefit from TransMagic’s suite of tools. Visit Transmagic.com for more information and to get a free 7-day trial.