Figure 1 – The R12 Interface Icon, quick access to commands
For basic translation and repair, TransMagic is pretty simple to use. Use ‘Open’ to open parts and assemblies, and Save As to save to the output format of your choice.
But there are a lot of potential nuances to file translation and repair; where do you start? To answer that question, here are my top seven tips for new TransMagic users:
Open and Import
Open (see figure 1) is the simplest way to open any native or neutral format. In R11 and previous, the Open button had an upper and lower half (the bottom half was for ‘Import’), so it mattered which part of the button you clicked on. Import is useful if you want to import a file into another file. In R12, the Import button is accessed via the R12 icon.
Save As and Export
Save As (the third button on the Home tab) is how you can save out your data to any of the formats TransMagic supports. In R11 and previous versions, the Save As button had an upper and lower section. The lower section allowed you to do an Export – in Release 12, Export is accessed through the R12 icon in the upper-left corner of the screen.
Export is useful if you have an assembly and you want to export just one part in that assembly into another format. The Export button will be grayed-out (inactive) until you have selected some geometry. The easiest way to select geometry is to use the Selection tools on the left side toolbar.
Selection Tools

Figure 2 – Single Selection options
Selection Tools (see figure 2) reside in the left toolbar, and careful use of these tools will improve the speed and efficiency of your work. The arrow indicates Single Select, the window is for Window Select (anything crossing or inside the window is selected), the Select All is for selecting everything on the screen, and there is also a Deselect. Note that Single Select and Window Select have a flyout arrow that allows you to choose what kind of entities you are interested in.
Selection Options: Dynamic Selection is the default, allowing you to click any object once if you want a face, twice if you want a body (or a part), three times if you want a subassembly, and four times if you want the next assembly up in the hierarchy. I use the Body Selection option often, when I just want a solid or surface body without having to think about the clicks. You can also specifically set selection modes to Body, Face, Edge, Vertex and PMI. At the bottom of the selection flyout are options to filter your selection sets by Solid Bodies, Surface Bodies, or Wire Bodies. Window Select has the same options as Single Select; window select can be used to, for example, select all of the PMI inside of a window.
Settings
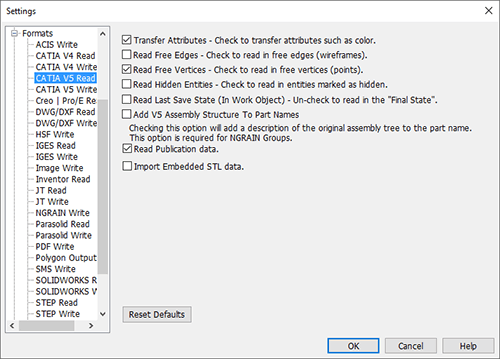
Figure 3 – Transmagic Settings
Settings are available for every format TransMagic supports, for import and export. So before you import, consider what data you need from the file, and before exporting, consider what data your team or your customer/supplier needs from the file. For example, consider figure 3:
CATIA Read: From the Settings dialog, we have opened up Formats and selected CATIA V5 Read. This gives us access to seven checkboxes, at the time of this writing. Generally the defaults are good for most situations, but it may be that you would like access to Hidden Entities or Free Edges – if so, just check those boxes before you do your import.

Figure 4 – Transmagic Settings for JT Write
JT Write: In the dialog box (see figure 4) for JT Write settings, it may be that the company you are sending your CAD data to needs B-Rep data, and they may also require a particular version of JT. It is also becoming more common for companies to insist that their suppliers use a particular JT Config File to guarantee that the data is in a format that works seamlessly for them on the receiving end.
Use the Automatic Tool Tips
Hover any menu option and an automatic tooltip will pop up explaining what that tool is.
Use the Built-In Help
Click the ? at the top left area of the TransMagic interface. This will launch the TransMagic Quick Start Guide, which has sections for TransMagic Layout, Hot Keys, Auto Repair Wizard, and a collection of New User Tips. The TM Ribbon Interface section covers customized menus, ribbon tabs, settings, and Right-Click menu options. There is help for MagicHeal (for those who have it installed) as well as general Support (formats and system requirements).
Watch the TransMagic Training Videos
There are product training videos available via the TransMagic.com website on the Video Tutorials page.
You can also find the training videos on the TransMagic channel of YouTube.com.
TransMagic training videos cover basic repairs, advanced repairs, using cutting planes, using the SOLIDWORKS and Inventor add-ins, splitting and trimming surfaces, redlining and marking up views, creating manual and interactive dimensions, using colors to select geometry, applying full repair to parts or assemblies or localized regions, changing part properties, calculating part properties, 3d collaboration, using MagicCheck to compare parts to part and point to part, and using TransMagic Command to automate translation and repair of many files at once into multiple formats. Stay tuned, because we will be adding many more videos to the Video Tutorials page in the near future to help you get the most out of TransMagic products.
Use the Right Format for the Right Job
Making the best choices for formats can save you a lot of work down the road. This is an complex subject that we will address in another article, but generally speaking, native files are better than native kernel files, which are better than neutral formats (such as STEP and ACIS, among others). Working with your customer or supplier to get you the best possible file format you can read, and sending your customers and suppliers the best possible format they can read will save both you and they a lot of time and effort. TransMagic’s full read/write matrix is visible on each product page, whether it’s SuperView, Pro or Expert.
We hope this brief look at tips for new TransMagic users has helped you become more productive.
Questions? Email or Call TransMagic Support; if you are trying to accomplish something in TransMagic and you are having problems, we want to know about it.
Test Drive TransMagic
You can test drive TransMagic SUPERVIEW, along with MagicHeal and MagicCheck Add-Ons for 7 days at no cost – just click this link to get to the free eval. If you need to be able to write CAD formats to do a proper eval, let us know at sales@TransMagic.com.