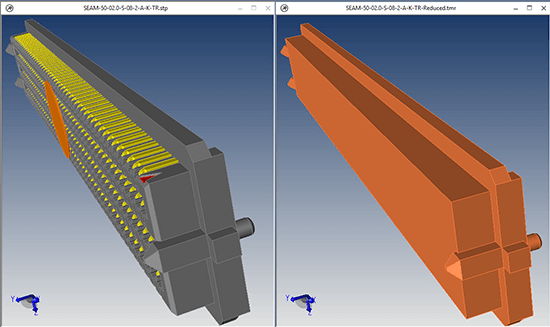
Figure 1 – The Reduce Component Filesize strategy can have a huge impact on productivity.
You can use the Reduce Component Filesize technique to drastically improve your large assembly performance; using Boolean operations to consume unneeded features trimmed this 30 MB assembly down to a 3 MB part in just minutes. Simplified parts mean that wait times are reduced, graphics performance is improved, ultimately translating into reduced costs of doing business.
To see how TransMagic can simplify your components, watch this short video, or check out the step-by-step instructions below.
Video – Reduce Component Filesize
Text – Reduce Component Filesize
The process of simplifying a CAD component will vary from part to part. Here is one example; note that this process makes use of the Boolean Union feature which is currently available in both TransMagic Expert as well as the MagicHeal add-on.
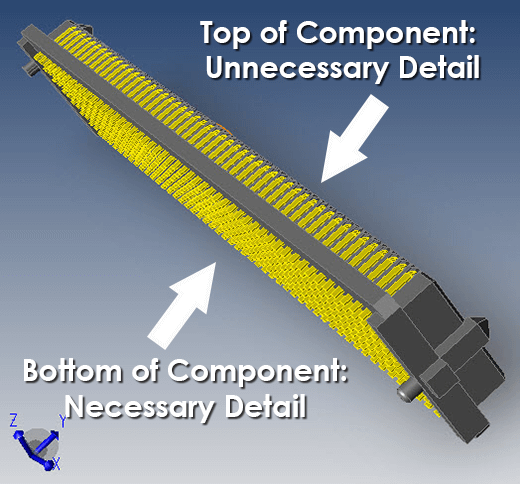
Figure 2 – This component has more detail than is needed in our application.
Determine what you need and what you don’t
In this example (see figure 1), the customer needed the pin locations on the bottom of the component, but not those on the top.
Flatten the Assembly
If you find that you have an actual assembly, use the TransMagic ‘Flatten’ feature to flatten a true CAD assembly down to a CAD part made up of multiple solid bodies. This will enable our boolean operations later on.
Select and Union all the solids
Select all the solid bodies and run Boolean Union (from the Operations menu or the MagicHeal menu).
Select key faces as a Bounding Box around the unwanted geometry
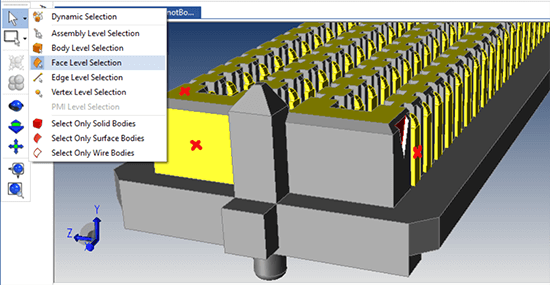
Figure 3 – Selecting the Faces to define the Bounding Box
Using the down-arrow next to the Single Select button on the left-side toolbar, get into Face selection mode. Select any faces that describe the extents of the geometry you want to boolean away. In figure 3, a red ‘x’ marks three faces, then you’ll need one more on the far side of the component to define the extents of the Bounding Box. Use the control key while selecting faces. Then, from the Operations menu, choose Bounding Box; a Bounding Box will be created, based on your face selections.
Select All and run Boolean Union again
Now that you have a bounding box, you need to combine it with the rest of the model using Boolean Union.
Run Lite Repair to stitch it all together
Just to make sure the whole part is one single watertight solid, run Lite Repair. Find Lite Repair on the Home tab.
That’s it! A few minutes of work and now you have a model that 1/10th of the filesize and ‘weight’ as previously! Using this technique you can reduce the size of commonly-used components so that working assemblies don’t grow excessively large and slow.
Try the TransMagic Eval
As mentioned, boolean operations are only available in TransMagic EXPERT and in the MagicHeal add-on. If you want to test this functionality out, there is a free TransMagic SUPERVIEW demo, which comes loaded with MagicHeal (for repairs) and MagicCheck (for comparisons). To try the TransMagic Eval, CLICK HERE.