 Taking the time to optimize and save your settings can make a huge difference in performance; they can determine how much work is necessary on a part or assembly, whether you are working in inches or millimeters, how fast files will open (based on whether you are running repair upon load or not), whether edges or vertices are included in the translation process, how hidden or suppressed geometry is dealt with, whether JT files will be considered as Visrep or Visrep + Brep, and much more. This article will discuss some of the most important of these settings, and demonstrate how you can save your TransMagic settings individually, as a department or as a company.
System Defaults are a Good Start
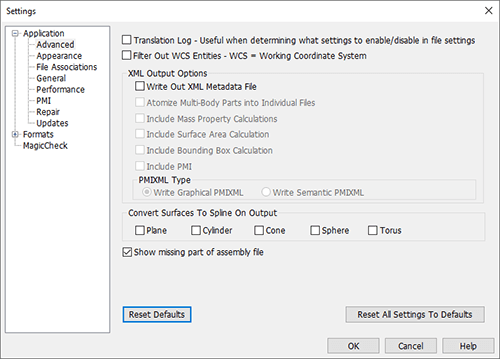
Figure 1 – TransMagic Settings Defaults
Optimize your Settings
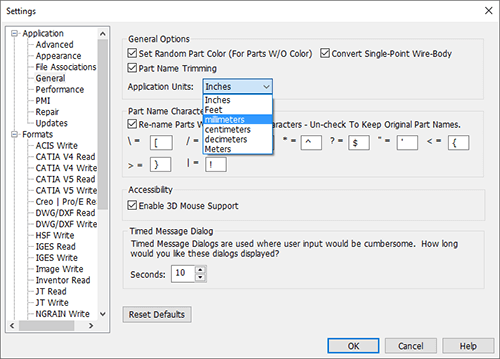
Figure 2 – General Settings include settings for Units.
Nevertheless, each company is different. Below I will suggest some settings that you may want to adjust, depending on your situation:
Inches or Millimeters:The default for units in TransMagic is Inches, but many firms, particularly in Europe and Japan, work exclusively in Millimeters; in Settings, they can go to General > Application Units and select ‘millimeters’.
Auto Repair Wizard During File Loading: If you regularly get large files in, you may want to turn off Repair > Auto Repair Wizard During File Loading, because repair is something you can do any time you want, and forcing a repair while the file is loading just slows down the process of getting the file open.
Formats Settings: Each CAD format has its own unique settings that can play a big role in how much extra work the designer, estimator or engineer has to do downstream. Examples include which version of the Parasolid modeling kernel is being used, whether edges or free vertices are included, and whether JT files will include Brep (Boundary Representation) data. Spending a little time optimizing these nuances can payoff big later for both the customer and the supplier.
How to Save your Settings

Figure 3 – Clicking Export Settings File allows you to save your TransMagic settings.
Using the Export Settings File option from the Help menu will generate a file named TransMagic_R12.ini and save it to the C:\Users\Public\Documents\TransMagic\Settings folder. Immediately upon initiating Export Settings File, you will get a confirmation message ‘Settings File Created’. Any user can do this, as long as they have write permissions to that folder.
Department-Wide Implementation
Users can implement the Settings.ini individually, or a system administrator could use various network configuration tools such as Microsoft’s SCCM (System Center Configuration Manager) to send copies of the folder and ini files to all users automatically. Individual users can alter the company settings temporarily by editing them for just that session, and they will be reset the next time TransMagic is launched. If individual users want to alter their settings permanently, as long as they have write permissions to the Settings folder, they can click Export Settings File to write over the existing ini file.
Taking the time to optimize and save your settings saves time and effort both on an individual and work-group level. If you have any questions about this subject, contact us at social@transmagic.com, or support@transmagic.com.